Arctic LTER: How to Submit Metadata and Data
Research investigators, assistants and students who collect the data are responsible for data analysis, quality control, documentation and data management protocols. Investigators may use any software for their data entry and analysis but when data are ready to be submitted to the Arctic LTER database the metadata and data must conform to the required Arctic LTER format. This format follows the LTER network’s “EML Best practices” and enables the dataset to be uploaded to the Environmental Data Initiative (EDI) or Arctic Data Center (ADC) data repository.
In the past, an Excel-based metadata form was used for entering metadata and data. The Excel file was then parsed by an R script to create the text template files required by EDI’s EMLAssemplyline R script. With the release of EDI’s web-based ezEML for entering metadata the Arctic LTER has adopted ezEML for entering and submitting datasets.
What is ezEML? It’s a web-based do-it-yourself tool for describing your data in the Ecological Metadata Language (EML) standard. Once completed the ezEML document will be ready for submission to a data repository, e. g. EDI, ADC. Following are instructions for using ezEML for publishing Arctic LTER datasets.
Preparing your Data.
- Organize and clean your data. See Environmental Data Initiative (EDI) Data Cleaning and Quality Control. Your data will need to be CSV (comma-separated value) text files before using ezEML.
- Note that in ezEML “Data Tables” are CSV data files with a single header row. Non-data Table files can be included under “Other Entities”. Examples of “Other Entities” include scripts in Python or R, zip files containing ancillary data, Arctic LTER Excel metadata files, methods/laboratory protocol documents, photographs, other imagery, etc.
- Tips for saving csv files from Excel
- TIME – If your dataset includes a column for “time” be sure to format these cells as “custom” and enter HH:MM as the format. You cannot just use 24hr format because any times before noon will appear as H:MM and EDI will not accept this. For example, if your time was 9:30AM then 24hr time format in excel will display 9:30, whereas the custom HH:MM format will display 09:30 which is what you want.
- DATE – format all your date cells as “YYYY-MM-DD” (example: 2023-06-04) or “YYYY-MM-DD HH:MM, i.e. standard ISO date format.
- ROUNDING DATA – If you haven’t already done so, be sure to round any numbers to the total number of digits after the decimal that you wish to include. The easiest way is to format the cells as number with the desired number of decimals places. When saved as CSV the numbers will be saved as displayed. Rounding to “significant figures” is more involved but a search of the web will demonstrate the formula needed.
Creating new ezEML Documents
Using ARC Starting Template
- Open https://ezeml.edirepository.org/eml and log in with one of the log in options. It’s best to use the same login every time since your past datasets will be available once logged in.
- Create a new EML document by selecting the menu tab EML Documents -> New from Template…
- Expand LTER -> ARC, select the ARC starting template and enter a name for your new ezEML document. The ARC starting template has some basic Arctic LTER information already populated (Arctic Information Manager Contact, Metadata provider, LTER-ARC Keyword, and related project “Arctic LTER”). Other ARC templates will contain some of the Arctic LTER personnel and sites and can be used to import Creators, Associated Parties, and Geographic Coverages into the new document.
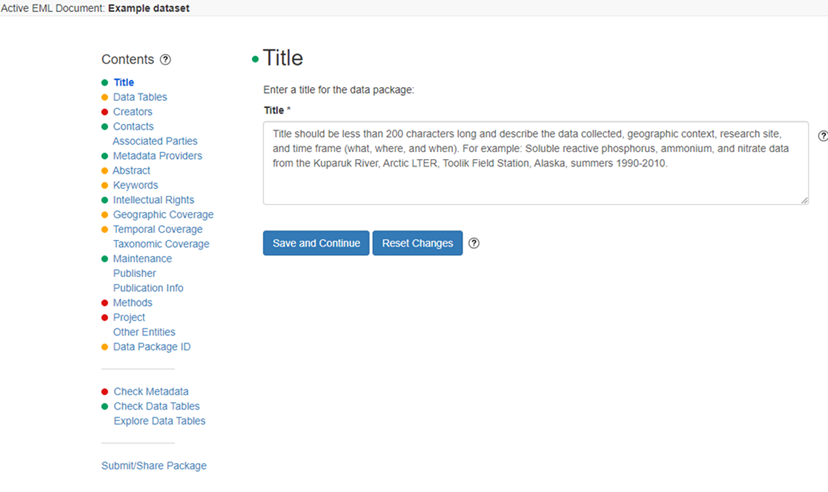
- You will then be presented with a page of metadata sections. See the following EML Document Sections.
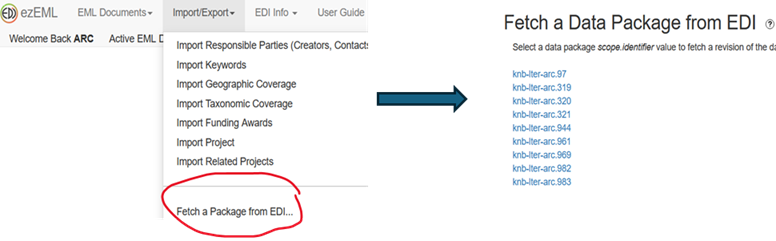
Updating an existing Dataset from EDI
- To update an existing dataset, you can fetch the EML package from the EDI data portal. You will need to know the ID of the dataset which can be found as "Package ID" when viewing the dataset on the EDI portal. For the Arctic LTER, the ID will have a prefix of “knb-lter-arc”.
- Select “Get Associated Data Files” to include the data files.
- The default ezEML document name will be the Package ID. You can rename the ezEML document to make it more meaningful.
- For some datasets, you will get a message about “Editing Text Elements in Imported XML”. You can edit the text and ignore or delete the elements. For more control over the formatting of the text, you can add Markdown elements. See ezEML FAQ “How do I enter and preview Markdown and LaTeX?”. This is particularly useful when there are equations, tables, etc. in the methods.
- Update any metadata and Data Table(s). If just adding newer data and the variables are the same, upload the new csv file. Otherwise, edit/add column properties as required. See the following EML Document Sections.
- Many of the older datasets will have outdated or incomplete fields. Use the “Import …” button to import information from the ARC templates or other ezEML documents and delete the old ones. Tip: if a researcher does not have an ORCID ID then enter 0 to get the bullet to turn green.
EML Document Sections
Proceed through each section to fill out the metadata. The “?” are links to helpful popups that provide more details and useful hints. The color of the bullets indicates warnings and errors and when clicked will present reasons for the warnings and errors.
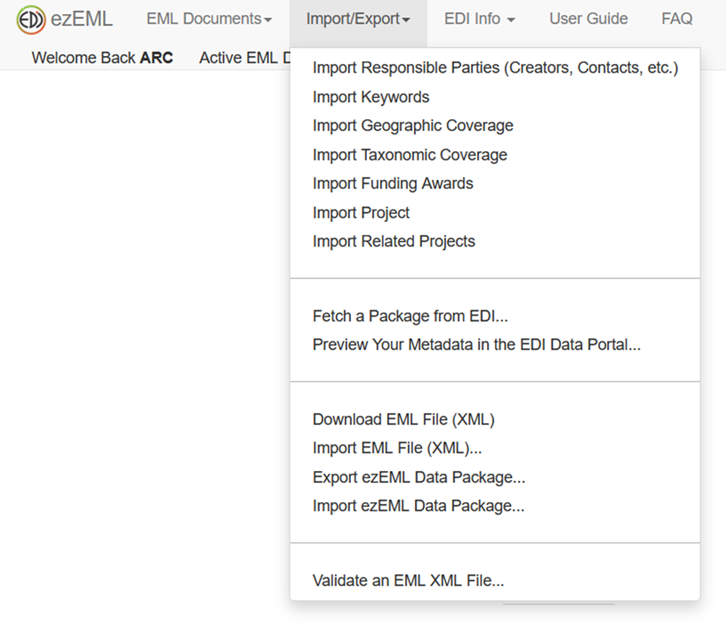
When entering information in the different metadata sections there may be an “Import ….” button. When clicked you can select an ezEML document that you have worked on in the past or one of the templates. When open for import you can then select what to import. Below is an example using the ARC Aquatic template to import sites.
Data Tables
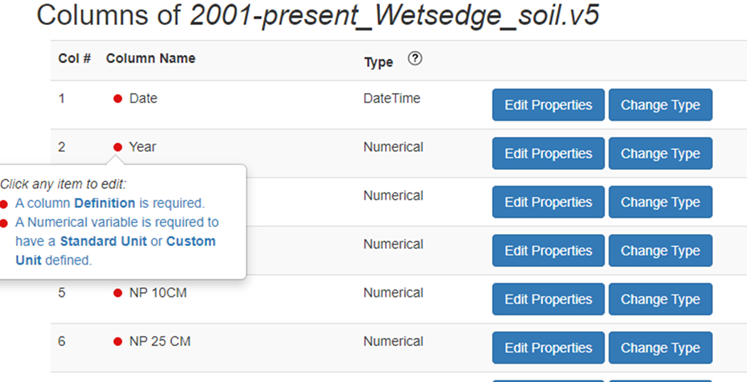
- First, click “Load Data Table from CSV File”, click “Choose File” to locate your CSV and then click “Upload”
- Once uploaded, edit the column properties. ezEML will try to determine the type of data for each column. Text or integer variables can be misidentified as Categorical (Categorical variables contain alphanumeric codes used to categorize data). Use “Change type” for those that are incorrect.
- Click on any orange or red bullets to see what is missing.
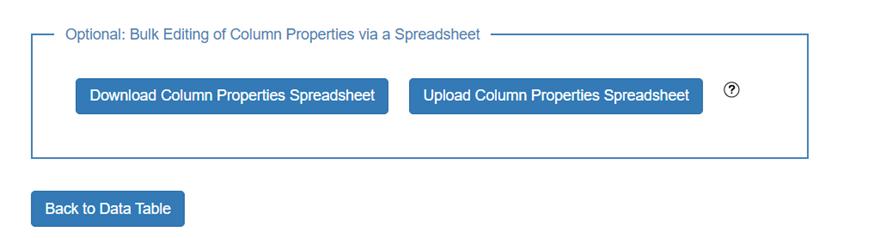
- For large datasets, it’s easier to download the “Column Properties spreadsheet”, enter the information and then upload it back in. Click the “?” for details.
Creators
- The Creator is the author(s) of the data package. Citations generally list creator names in the order shown, so the order is significant.
Contacts
- This should include the Information Manager(s) and other designated contacts and should be kept current.
Associated Parties
- This may be affiliated collaborators or personnel on the project. Associated parties are not required and are not listed in a citation.
Metadata Providers
- The metadata provider is the person(s) or organization(s) responsible for producing or providing the metadata content. The “ARC Starting Template” will have the Arctic LTER already entered.
Abstract
- Provide a short description of what data are in the file, the method, the sampling location(s), etc. It will be used by full-text searches, so should be rich with descriptive text.
Keywords
- There are many options for keywords as part of the “LTER Controlled Vocabulary”. You should choose words on this list, but you can add your own keywords if they are not on the list. Don’t duplicate keywords unnecessarily, e.g. lake, lakes.
- LTER-ARC should be added as a keyword to facilitate the search for Arctic LTER datasets.
Intellectual Rights
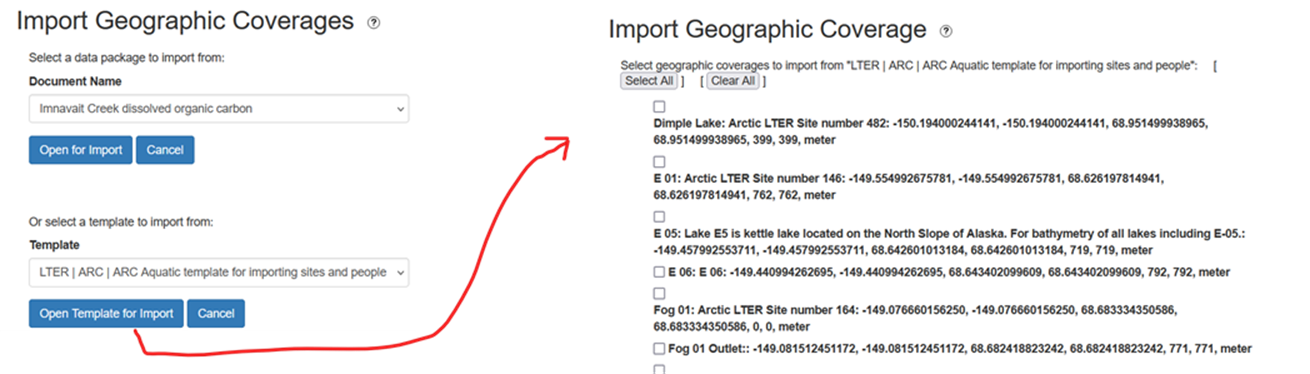
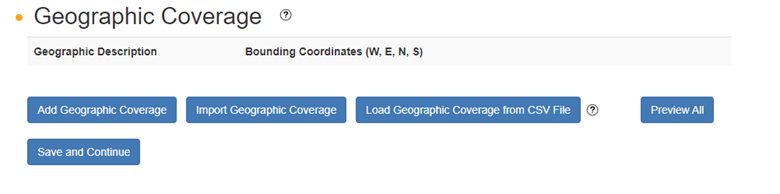
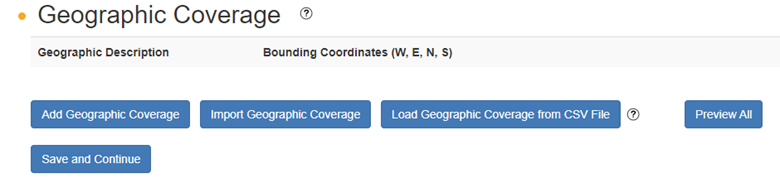
Geographic Coverage
- The easiest way to add sites is to import the sites from the ARC site templates or other datasets you have edited.
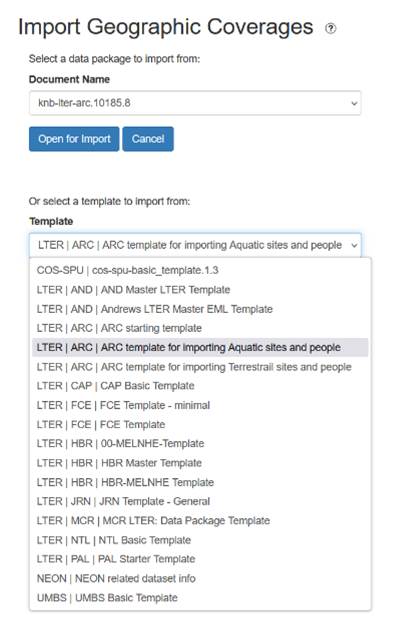
- Click “Import Geographic Coverage”
- Then under Template, select one of the templates. The screen capture below shows the “LTER/ARC/ARC template for importing Aquatic sites and people” selected.
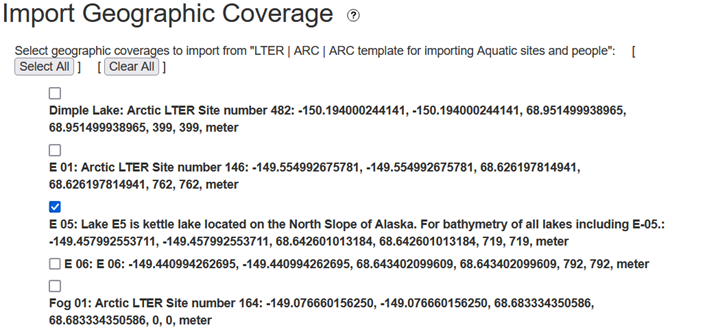
- Go through the list and check the box next to each of the sites that are referenced in your dataset.
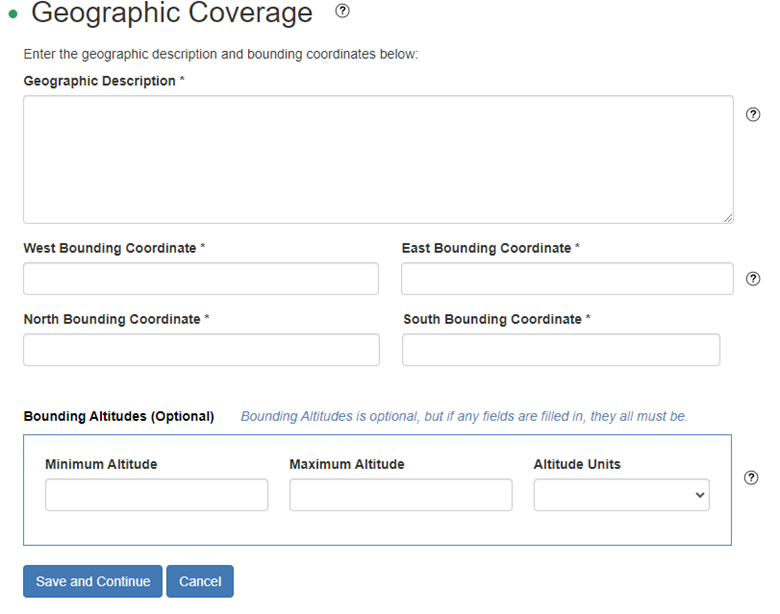
- If your site(s) are not listed in a template or ezEML document, click “Add Geographic Coverage”.
- For geographic description, you must use the STANDARDIZED LTER SITE NAME if one exists. For example, if you have data from the lake Fog 01, the official name for this site is: Fog 01. Do not put “Lake Fog 1”, do not put “Fog 1” do not put “Fog 01 Lake”, do not put "Fog 1 Lake”, do not put “Fog lakes 1”, do not put “Fog One”, do not put “Fog Lake One”, and DO NOT invent some new name for the site. If you are unsure of the STANDARDIZED LTER SITE NAME, please contact an Arctic LTER information manager.
- If the site is a single point, then put the same longitude coordinate for both “West Bounding Coordinate” and “East Bounding Coordinate”, and then the same Latitude coordinate for “North Bounding Coordinate” and “South Bounding Coordinate”
- Generally, we don’t worry about adding altitude for our sites.
Temporal Coverage
- For most data sets, enter the year of the earliest data point(s), and then the year of the last data point(s) in the file. If data is from a single season, use a date range in the ISO date format: YYYY-MM-DD.
Maintenance
- Indicate the version of the file (a new file is version 1 by default) and the reason for any changes, the person who created or updated the file and a date.
- Use the Maintenance Update Frequency drop-down to indicate how often the dataset will be updated.
Publisher
- The default publisher will be EDI or ADC, so leave this section blank.
Publication info
- Unless you plan to publish the data in other repositories, leave this section blank.
Methods
- Describe the methods of sample collection, analysis, processing, etc. Include information about the instruments used and any relevant citations. Write it as if someone other than you will analyze the data and get the correct results without asking questions about data creation.
- If there is a protocol or methods document add it in the Other Entities section.
Project
- The Arctic LTER is the default project, but depending on the other affiliated projects or PIs, you may need to add additional entries. If the Arctic LTER is not the main project, then add it as a Related Project.
Other Entities
- This is where you can include additional information (other than data tables) that may go along with what you’re publishing. This could be maps, imagery, computer scripts, etc.
Data Package ID
- The Arctic LTER information manager will complete this section. For new datasets, the next available ID number will be assigned while updated datasets will have the version number incremented.
Check Metadata
- This is where any errors or missing information is noted. If you still have yellow or red dots for any sections, they are going to appear here and won’t go away until you remedy them. Keep in mind that there are some of the yellow dots that are “acceptable” for example “Data Package ID”
Check Data Tables
- Use this to identify any unexpected formats or missing values, or errors. It will return every entry that needs to be corrected. Click on any yellow or red dots to see the errors.
- If there are errors in your table, such as not formatting the time correctly (see above), then you can adjust your CSV, re-save it, go back to the “data tables” section and select “re-upload”.
- After you re-upload the file, run the “check data tables” step again and make sure it doesn’t return any errors.
Explore Data Tables
- This will let you examine your data tables using EDI's Data Explorer (DeX) app. Using DeX, you can get an overview of your data and perform various "sanity checks" on the data. You can profile the data, subset it, view plots, etc.
Submit/Share Package
- This allows you to send the data package and metadata to others to review. Keep in mind that only one person can make edits to a file at a time. Arctic LTER datasets must be reviewed by the Arctic LTER Information Manager before it is uploaded to a data repository. See the following “Final steps” section.
Previewing the metadata on the EDI Data Portal
Final steps: Sharing the completed EML document with the ARC Information Manager
- After you have filled out the fields and there are no errors or warnings, share the document with the Arctic LTER Information Manager (IM). The Collaborate menu item is on the upper right corner of the ezEML page next to Logout. Click “Invite a Collaborator” and use arc.lter.im@gmail.com as the Collaborators” Email address. The Collaborate feature lets multiple users access and edit the same data package. Note that you will need to close the EML document to make it available to others.
- The Arctic LTER IM will look over the document and give you feedback on any issues. Once completed the IM will assign the next available ID number or revision and submit the document to EDI. They will then send you the dataset reference with the DOI.